
Let’s get ready to celebrate the Holidays!!! With just a few simple piping tips, you'll be able to make this beautiful wreath -- a perfect addition for all of your holiday celebrations!
You Will Need:
- 9 Baked Cupcakes
- Red Buttercream Icing
- Green Buttercream Icing
- 4 Disposable Piping Bags
- Tip 1M
- Tip 352
- Tip 353 (2)
- 10 Inch Round Gold Board
- Tweezers with Round End
- Yellow Sugar Pearls
- Green Sugar Crystals
Note: For this project, you want cupcakes with a flat top. When piping leaves, a flat top cupcake helps them hold their shape. Cupcakes that are domed can cause your buttercream to lay on the curve causing your leaves to bend backwards. If your cupcakes have a dome, simply slice this off before you begin.
Poinsettia Instructions
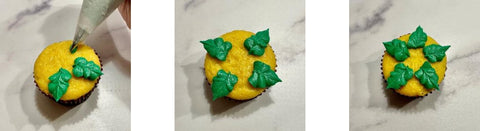
1. Begin with a piping bag fitted with tip 353 that is filled with green icing. Hold the bag at a 45-degree angle with the pointed ends facing up and down.
2. Beginning 1/2 inch from the edge of the cupcake, pipe the first leaf by applying pressure on the bag as you wiggle it slightly while moving it away from the center of the cupcake. When you reach the edge of the cupcake, release the pressure on the bag to finish the leaf. The wiggling motion adds a wrinkled texture which makes the leaf look more realistic. Pipe 4-5 leaves around the cupcake.
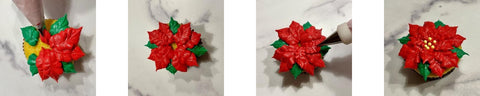
3. Next, use a piping bag fitted with tip 353 that is filled with red icing. Use the same technique as the leaves.
4. Starting about 3/4 inch from the edge of the cupcake, pipe your first petal to slightly overlap the edge of one of the leaves. Angle the piping bag up slightly.
5. Pipe 7-8 petals around the cupcake. The leaves should be peeking out underneath the red petals.
6. Now use a piping bag fitted with tip 352 that is filled with red icing. Start in the center of the cupcake with the tip between 2 large red petals. With the piping bag angled up, rock slightly back and forth. Pipe 5 petals.
7. To finish, place 7 yellow sugar pearls in the center of the flower. Make 3 poinsettia cupcakes.
Green Rosette Instructions
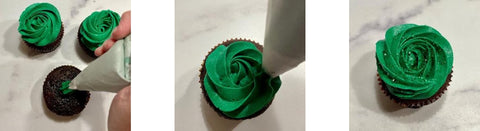
1. Place a 1M tip in a piping bag filled with green icing.
2. Hold the bag straight up, with the tip just slightly above the surface of the cupcake.
3.Starting at the center of the cupcake, squeeze to form a star. Without releasing pressure, raise the tip a little bit and move it slightly to the side. This will be the starting point of your rosette.
4. Using a circular motion, pipe a tight circle around to the starting point of your rosette. Decrease pressure as you finish your rosette. Stop squeezing right before you connect, then pull away.
5. Sprinkle with green sugar crystals. Make 6 green wreath cupcakes.
Assembly
1. Arrange the cupcakes on a 10 inch round cake board or drum.
2. If you’d like, put a dollop of icing underneath each cupcake to help secure them to the board.
3. Place royal icing holly leaves on top of the fresh green icing to add a festive touch to your wreath.
4. Add a holiday message layon in the center of the wreath.
5. Sit back and watch as your friends and family enjoy your creation!
Note: If you are taking your cupcake wreath to an event, we recommend transporting your wreath in a 10 inch cake box.


